This pattern is very flexible, but here are some guidelines for sizes to work with.
Newborn: waist - 13", leg - 6", rise - 14" (<11 lbs)
Small: waist - 15", leg - 8", rise - 16" (9-15 lbs)
Medium: waist - 18", leg - 9", rise - 18" (14-21 lbs)
Large: waist - 20", leg - 11", rise - 20" (20-27 lbs)
Starting with waistband: ch 9.
Row 1: Sc in 2nd ch from hook and sc in each ch across (8 sc), ch 1, turn.
Row 2+: Working in back loops only, sc in each sc across, ch 1, turn. Repeat until waistband measures desired length.
Row 1: Sc along length of waistband, ch 1, turn.
Row 2+: Sc in each sc across, ch 1, turn. Repeat until sc section measures desired height (approximately: newborn - 2", small - 2.5", medium - 3", large - 4"). This number of rows can be adjusted for a longer or shorter rise, if needed.
Next rows: Ch 1, *skip first sc and sc in each sc across, leaving 1 sc at end, total decreased st per row is 2. Ch 1 and repeat from * until piece ends in a triangle point.
Fold in left, right, and bottom to the front of the diaper and whip stitch or sc down middle and each side, leaving appropriate sized openings for legs.
Photo coming soon!
Monday, June 15, 2009
Saturday, June 13, 2009
My DIY Screen Printing Tutorial
It circulated the internet like wildfire in its day. Well, maybe not like wildfire--perhaps more of a briefly burning match flame. But still, it was seemingly everywhere and still tops Google searches for the topic. This method is by no means meant to replace actual silk screening, but for those of us that don't want to tackle acquiring all the goods along with photo emulsion, this is a good enough substitute for personal use! So, here it is, in all its glory...
Materials needed: a t-shirt, yucky/cheap paint brushes, an embroidery hoop, screen printing ink (I use Speedball brand), a glue that isn't water-soluble (I use Mod Podge), curtain sheer material/tulle/old nylons, and a computer with a printer (or a good hand for drawing things).

Find an image you like and that has good contrast. My cow needed to be "cut out," and I've only got Microsoft Paint on this computer and it worked fine.

Save the image as a Monochrome Bitmap file and it will turn it black and white. If this loses all the detail, fudge around on Paint or try a different picture, haha.

Print it out so the image is the size you want it on the t-shirt (and also so it's not bigger than the embroidery hoop you spent ¢67 on).
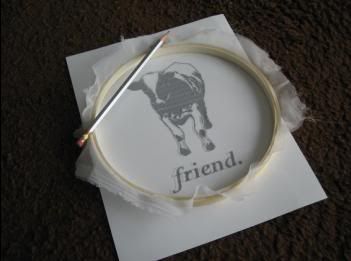
After pulling the sheer curtain material/tulle/old nylons tight across the embroidery hoop (and screwing it shut real good), trace the image onto the material with a pencil with the material close to the paper, not upside down so it's far away.

You should be able to see the pencil outline easily without squinting too hard. If it's too detailed, fudge some more.

Turn the thing over and with the glue, paint all the "negative space," (all the places you don't want ink to go, the white space). Make sure the material isn't touching whatever surface you're working on otherwise you'll end up gluing the whole thing down, obviously.

Some people say you can use tape to fill in the bigger area, but I think that painting the glue on all over the larger spaces is the best part, but do what you will.
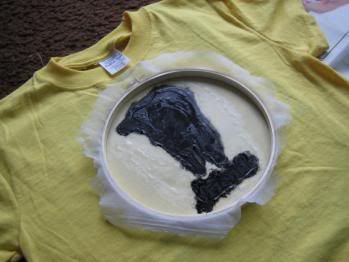
After the glue dries, center the image on the shirt face down, and I sort of stipple the ink through the material making sure it's fully saturated, but also making sure not to glob it all over the place.
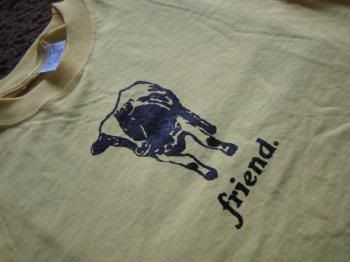
Carefully peel it back, wait for it to dry, and follow the "setting" directions on the ink (mine is to iron it on medium 3 - 5 minutes each side with a piece of cloth/paper between the iron and the ink).
(Originally posted here: http://community.livejournal.com/craftgrrl/3674467.html)
Materials needed: a t-shirt, yucky/cheap paint brushes, an embroidery hoop, screen printing ink (I use Speedball brand), a glue that isn't water-soluble (I use Mod Podge), curtain sheer material/tulle/old nylons, and a computer with a printer (or a good hand for drawing things).
Find an image you like and that has good contrast. My cow needed to be "cut out," and I've only got Microsoft Paint on this computer and it worked fine.
Save the image as a Monochrome Bitmap file and it will turn it black and white. If this loses all the detail, fudge around on Paint or try a different picture, haha.
Print it out so the image is the size you want it on the t-shirt (and also so it's not bigger than the embroidery hoop you spent ¢67 on).
After pulling the sheer curtain material/tulle/old nylons tight across the embroidery hoop (and screwing it shut real good), trace the image onto the material with a pencil with the material close to the paper, not upside down so it's far away.
You should be able to see the pencil outline easily without squinting too hard. If it's too detailed, fudge some more.
Turn the thing over and with the glue, paint all the "negative space," (all the places you don't want ink to go, the white space). Make sure the material isn't touching whatever surface you're working on otherwise you'll end up gluing the whole thing down, obviously.
Some people say you can use tape to fill in the bigger area, but I think that painting the glue on all over the larger spaces is the best part, but do what you will.
After the glue dries, center the image on the shirt face down, and I sort of stipple the ink through the material making sure it's fully saturated, but also making sure not to glob it all over the place.
Carefully peel it back, wait for it to dry, and follow the "setting" directions on the ink (mine is to iron it on medium 3 - 5 minutes each side with a piece of cloth/paper between the iron and the ink).
(Originally posted here: http://community.livejournal.com/craftgrrl/3674467.html)
The beginning
I hope that this blog can become a fun and up to date resource and log for all of my interests. I'm sure it will house things from crafts to parenting to cooking, so my stand-by "Strings to Things" seems to fit. Stay tuned for what will come!
Subscribe to:
Posts (Atom)