Materials needed: a t-shirt, yucky/cheap paint brushes, an embroidery hoop, screen printing ink (I use Speedball brand), a glue that isn't water-soluble (I use Mod Podge), curtain sheer material/tulle/old nylons, and a computer with a printer (or a good hand for drawing things).

Find an image you like and that has good contrast. My cow needed to be "cut out," and I've only got Microsoft Paint on this computer and it worked fine.

Save the image as a Monochrome Bitmap file and it will turn it black and white. If this loses all the detail, fudge around on Paint or try a different picture, haha.

Print it out so the image is the size you want it on the t-shirt (and also so it's not bigger than the embroidery hoop you spent ¢67 on).
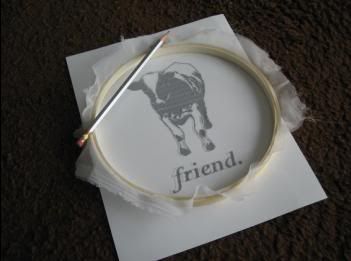
After pulling the sheer curtain material/tulle/old nylons tight across the embroidery hoop (and screwing it shut real good), trace the image onto the material with a pencil with the material close to the paper, not upside down so it's far away.

You should be able to see the pencil outline easily without squinting too hard. If it's too detailed, fudge some more.

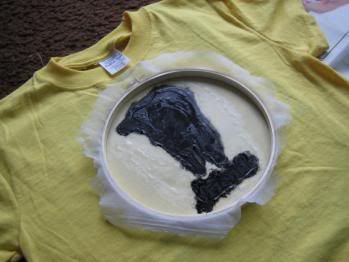
Turn the thing over and with the glue, paint all the "negative space," (all the places you don't want ink to go, the white space). Make sure the material isn't touching whatever surface you're working on otherwise you'll end up gluing the whole thing down, obviously.

Some people say you can use tape to fill in the bigger area, but I think that painting the glue on all over the larger spaces is the best part, but do what you will.
After the glue dries, center the image on the shirt face down, and I sort of stipple the ink through the material making sure it's fully saturated, but also making sure not to glob it all over the place.
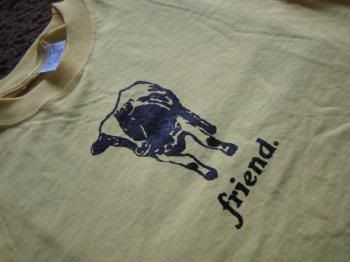
Carefully peel it back, wait for it to dry, and follow the "setting" directions on the ink (mine is to iron it on medium 3 - 5 minutes each side with a piece of cloth/paper between the iron and the ink).
(Originally posted here: http://community.livejournal.com/craftgrrl/3674467.html)
I saw this tutorial a few months ago, but didn't get around to doing it until now. I have made the screen, and am making shirts tomorrow - I can't wait! Thank you!
ReplyDeleteI hope I don't sound stupid for asking this, but I was just wondering what you use/how you wash the screen off?
ReplyDeleteThanks, Rachel.
Wow Rachel - I just want to say thanks so much for this tutorial! I came across it on Live Journal last year, & it prompted me to give this method of screen printing a go myself.
ReplyDeleteI was so impressed with the results, I've since set up an Etsy shop & started selling some of my greyhound-inspired prints there.
I hope you don't mind, but I've also drawn heavily on your original tutorial & am in the process of writing my own wee series of tutorials on the printing technique I use on my blog.
I have always linked to the tutorial I found on Live Journal when acknowledging you, but now I've come across your blog I will link directly here! Thanks a million ;-)
Jane.x
Hi dear...I really love your screen printing tutorial...
ReplyDeleteI would like ask whether the speedball screen printing ink can be used to draw directly on to the t-shirt.
Thanks and have a nice day!
I used your tutorial to create the screen for my class t-shirts this year. They turned out super cute! Thanks!
ReplyDeleteThank you. I have wanted to try silk screening, but it required buying new supplies I wasn't sure I was ready to invest in. This gets around that problem. Thanks!
ReplyDeleteI love this tutorial. I have always wanted to screenprint but could never afford the supplies. Thanks for the "work around". I can't wait to try this!
ReplyDeleteThank you! this is awesome. I've been looking for a way to silkscreen about 10 shirts without buying an expensive machine. Hope you don't mind that I linked to your tutorial from my facebook fan page
ReplyDeletehttp://www.facebook.com/home.php#/pages/Crafty-Is-The-New-Black/235861767307?ref=ts
and, if it's ok, I'd like to link it on my blog as well. Let me know!
This is a wonderful tutorial. This was how I made my first screen print after seeing a similar tutorial on youtube. I've since learned to screen print with emulsion and big screens, but this is such a great place to start to see if this is something you're into or just make one of your own fun shirts.
ReplyDeleteThis is an awesome DIY I have always wanted to know how to make my own t-shirts, i'm sick of buying them from Walmart or Bootlegger or stores of that sort. There all begining to look the same.. and EVERYONE has there tshirts hahaha.. Thanx you VERY VERY much for posting this! KEEP UP THE GREAT WORK!!
ReplyDeleteHey, this tutorial ROCKS! I just blogged about my experience using it here:
ReplyDeletehttp://sewastraightline.blogspot.com/2010/08/you-have-got-to-try-this-homemade-silk.html
thank you so much! you saved my bacon.
ooooooooooooooh I love playing with glue anyway! This is perfect for applying stencils for Alabama Chanin influenced garments! Thanks for sharing.. now.. where do I have some nice sheer fabric? mwah hahahaa
ReplyDeleteThis is great, I did it yesterday and it worked fantastic. I blogged here http://deb-robertson.blogspot.com/2010/08/present-week-till-christmas-week-5.html
ReplyDeleteWow yay i so want to do this but thought it would be soooooooo hard but you make it look achievable !
ReplyDeleteThanks
Does the ink eventually wash out? How does your shirt look using the black ink after several washes?
ReplyDeleteTHANKS sooo much for the tutorial. I look forward to trying your technique for reunion tshirts.
I saw your posting yesterday and tryed it!
ReplyDeleteI LOVE YOU!!!!
It's great!!!
Thanks you very much!!!!
how about for multiple colors..
ReplyDeletewhat kind of glue?
ReplyDeleteusing tape is common practice for silk screeners, but this is a brilliant DIY tutorial. having done real silk screening myself, this is perfect for simple home designs and very similar. great idea!
ReplyDeleteBrilliant work and tutorial, thanks for sharing it.
ReplyDeleteThanks for the information, and the tutorial. I'm trying to learn a little more because my son would actually loved to get involved in screen printing in Portland Oregon where his mom lives.
ReplyDeleteHello, A very insightful post. Thanks for the info. Its great that if our default settings are giving us messy or stringy builds, this dialog can probably help.Thanks for the information.
ReplyDeleteThank you for such a fantastic blog. I love this tutorial. I have always wanted to know how to make my own t-shirts screen printing utah,This help me very much .Thanks a lot for this post.Keep posting..
ReplyDeletestensile was the most traditional method of offset printing when machine were to expensive to produce such a small scale of design. And here the technique was well describe trough this article. I love it, keep writing girls.
ReplyDeleteGreat post! looks so Good informative printing tutorial post i love to read. Thanks you so much.
ReplyDeleteAwesome..post..
ReplyDeleteDIC India is main key player in ink industry in India as well as screen ink manufacturer. The ink in screen printing is applied thicker than digital printing, which results in brighter colors even on darker shirts.
There are many benefits of using screen printing. Its has many applications like making tshirt. Visit Full Sublimation Printing to buy customizable tshirts at the best price.
ReplyDeleteSuch a great Post!!
ReplyDeleteThanks for Sharing!!Custom embroidery Calgary Alberta
Custom promotional products in Calgary Alberta
Amazing post! Thanks for sharing this useful information.
ReplyDeleteMazak Spare Parts
Thru Wall
ReplyDeleteAir Conditioner
Travel Trailer Air Conditioner Units
Auto Air
Conditioner
Dyson
Air Conditioner Reviews
Upright
Window Air Conditioner
Slider
Window Air Conditioner
15 000 Btu
Air Conditioner
As Seen
On Tv Air Conditioner
Energy Efficient Air Conditioner Unit
Smallest
Btu Air Conditioner
A wonderfull way of dimpifying the screenprinting proces and making it available for the home hobbie proces. Been screenprinting for a long time when i was younger and stopped because i didn't have acces to an atelier anymore. This really makes it fun doing it again. Love it, thank you
ReplyDelete